How to build a northern chicken coop.
While I am by no means an expert on chicken coop design, I did just finish building my family a chicken coop (or chicken mansion??!!), and I do live in Alaska. Thus, I had to build a chicken coop suitable for our northern climate.
I talked to a number of other chicken owners around, and the opinions I received were almost as vast as the state of Alaska itself. In the end, I wanted something that would allow our family to have a half-dozen chickens, extra room for storage, and would allow the chickens to lay throughout the year without us having to deal with frozen eggs. I built the coop to be 8’x12′, with only 4×8′ of the coop dedicated to the laying hens. The rest of the coop I’m using for storage and for starting broilers in the spring.
In the long, dark hours of January, I learned how to use Google Sketch-up to create the basic framing plan so that I could start planning my lumber:
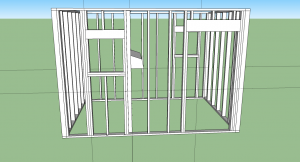
Side view looking to the west. Notice the two windows and the nest boxes that will be accessible from the storage part of the shed.
When it was time to build, I needed to decide what sort of foundation I wanted for the coop. I didn’t want to use sonotubes (too much work) or pier blocks (not easy to adjust for settling), so I decided to build the coop on 4×6 skids and level it with all-weather wood, understanding that I will occasionally have to re-level the building by jacking up the corners and placing more wood under the skids.
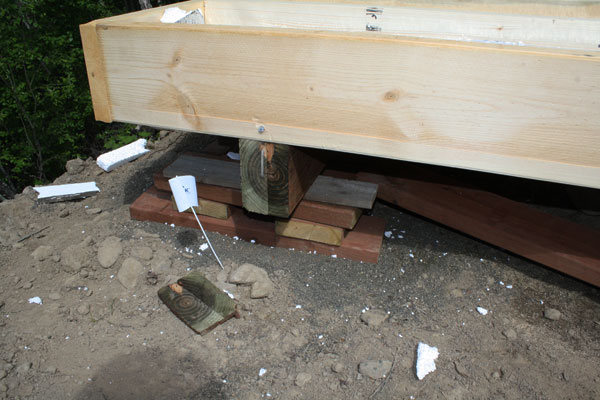
You can see I used 4x6 treated lumber for my skids 6 ft apart, with a 1ft overhang on 2x8 floor joists. .
Once the skids and floor joists were on, I needed to insulate the floor. I used the cheapest rigid insulation I could, but it still put me back over $100. I cut the insulation to fit between the joists, and used spray foam insulation to fill any gaps.
After the insulation was in, I used 5/8″ treated plywood for the floor. This is to prevent rot from any moisture that might accumulate from the chickens. Additionally, I put a thin layer of 3/8″ plywood on top of the treated floor in the coop section of the shed. This prevents the chickens from eating or pecking the treated lumber, and also gives me a “removable floor” for when the regular plywood eventually rots out.
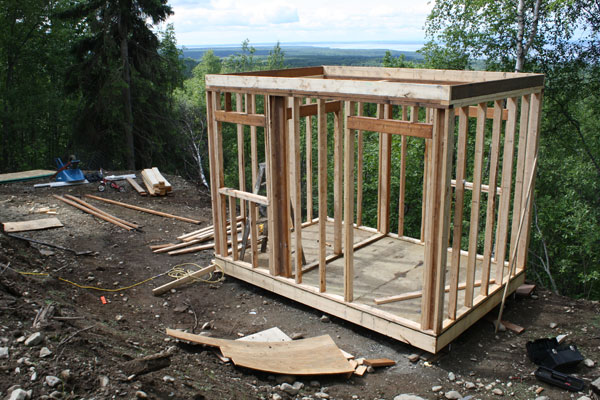
I found a couple of old windows on craigslist, and having the dimensions for the window openings, I framed up the walls:
Of course, I had help:
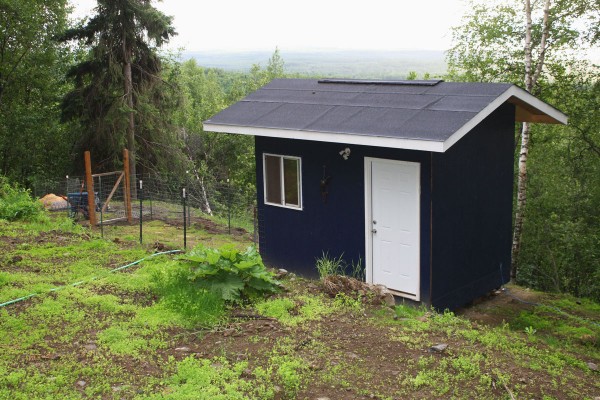
After the walls were up, I used I used 2x6s to frame ceiling joists and rafters at a 1:4 pitch. I decked the roof and put on rolled roofing (it was cheapest.) After a couple coats of stain, the coop was ready for windows, doors, and electric. I ran the electric with a place for a light fixture and an outlet on a switch in the ceiling on both parts of the coop. This will allowed me to put the heat lamp on a switch for the winter months. I’ll have a thermometer in the coop to be able to tell when it might be in danger of reaching freezing. Additionally, I hooked up the switch for the light to a timer, so that I can program the correct number of “daylight” hours the chickens need during the winter.
After I ran the electrical, I insulated the walls and ceiling of the coop with R-13 fiberglass insulation we had left over from previous projects, doubling up the insulation on the ceiling. I used excess vapor barrier we had sitting around to seal it off. On the inside of the coop, I put 3/8″ plywood up on the walls of the coop.
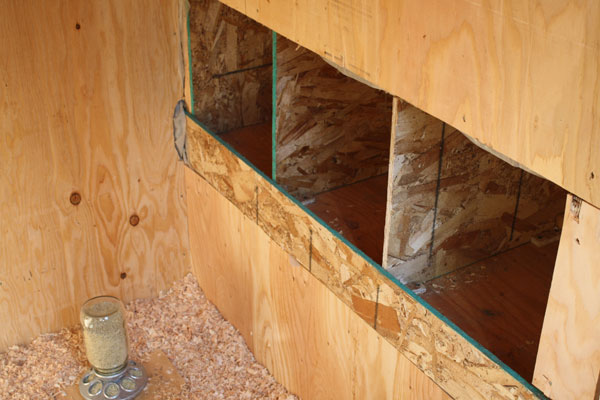
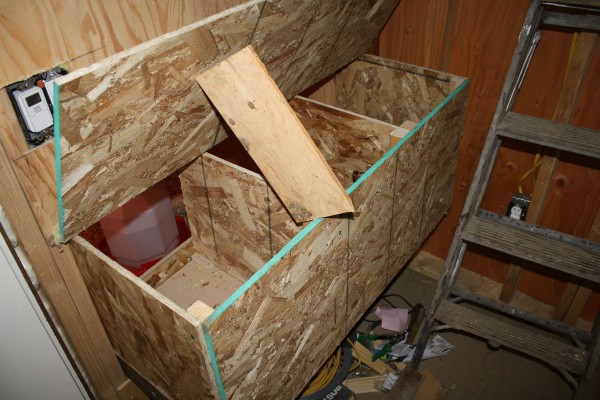
One of the nicer features of coop is the nest boxes that are built into the interior wall. This allows anyone to come and harvest the eggs without having to bother the chickens or get their feet dirty in the chicken litter. I made the nest boxes about 15″ x 15″.
Likewise, I created a door that I can easily pull open or drop closed once the chickens are old enough to start roaming around. This should provide them with a good level of security at night, and prevent any drafts. While many people consider a 12″ x12″ chicken door suitable, I made mine 15″ x15″. UPDATE: In bear country, make your opening as small as possible. A black bear was able to get into my coop through the chicken door and kill virtually all of my chickens.
I used t-posts for fencing and 5′ welded wire fence. I dug a trench around the perimeter of the chicken yard, and bent about a foot of fencing at the bottom, burying the bent portion facing away from the chicken yard. This will hopefully deter any dogs, foxes, or bears from trying to dig underneath the fence. I made a gate with scrap lumber, and my chicken coop was done!
COSTS:
I didn’t keep an exact tally of what it cost to build the coop, but it was probably around $1500. I already had the insulation, vapor barrier, romex wire, fence posts, and some lumber around. I would guess that buying everything new, at least at Alaska prices, would come out to around $2000.
In case you’re interested in the materials required, here’s a some-what complete list of materials.
MATERIALS:
Floor:
- 2 -12′ 4×8 treated
- 2 – 2x8x12′
- 10 -2x8x8′
- 3 pieces rigid insulation
- 3 cans spray insulation
- 3 sheets treated 5/8″ plywood
- 10 sheets 1/2 plywood
- 6 – 2x4x12′
- 9 – 2x4x8′
- approx 50 2×4 precut 8′ studs
- paint/stain of choice
- 7 -2x6x8′
- 2 – 2x6x12′
- 3 – 2x6x16′
- 18 -2x6x8′
- three rolls rolled roofing
- 8 sheets 7/16 OSB
- R-13 insulation
- vapor barrier and sealant
- shims for doors and windows
- exterior door
- interior door
- 100ft 12’2 romex
- boxes, switches, light fixtures
- 2 windows (mine were 3’x3′)
- 8 – 3/8″ plywood (interior of coop)

Hi Erik! Cool blog, thanks for sharing such great AK-specific info. I have a chicken coop insulation question for you…
I’m in the process of building a small, portable chicken coop (12 sq ft). I was originally planning to cover the insulation and vapor barrier with some sort of wood on the inside of the coop, but am considering skipping the wood now in the interest of saving some weight (the coop is getting heavy). My questions for you are: Did you cover your insulation/vapor barrier? If not, do the hen’s peck at it?
Thanks for any insight!
I used 3/8″ plywood on the inside of my coop for that very reason: I was afraid the chickens would peck at the vapor barrier and insulation. Maybe 1/4″ plywood would work, and make the coop a little lighter? Good luck!
Hello Alaska!
First great coop, this is exactly what I need for the harsh weather of the Laurentians region in Quebec. I have a question do you have any other pictures of the roof construction and the inside of the coop to all finished? Thank you for your time. Again GREAT COOP!!!!!!!!!
I’ll try to get some pics up soon!
Erik, did you insulate the laying boxes?
I didn’t insulate the laying boxes, but I wish that I did. While the rest of the coop stays warm, the eggs will freeze in the nesting box if the outside temps get below 0 degrees F.
Very nice, I forgot about the floor. Live in Northern Minnesota, going to build a chicken coop. I need to insulate the floor first. Lol again, very nice!
A few years have gone by, but I’m having some serious condensation issues in my coop. The ceiling is dripping, especially at night as they roost. I’m afraid they’re get wet/sick, frostbite, as well as the bedding is continually getting wet. It’s a 40 sq ft coop with 12 chickens. I’m in Ohio and dealing with average temps in the high teens/low twenties at night with mid 30s during the day, but the hard winter is coming. Feb is a bear!! I need to get this coop prepared
It has a truck cap on the top as a roof. The east and west sides have windows, but the roof material is whatever type of fiberglass/plastic that caps are made of. Anyone have any suggestions of how to shore up the humidity collecting on the ceiling? I’m just thinking of asking my husband to get some hard insulation sheets, and then cover with wood so they don’t peck/eat. And change the shavings out for sand.
Hi Erik, Could you sketch me a floor plan and post it so I can see the layout from the top? Thanks.