resources
How to Make Birch Syrup
With winter quickly melting away, the trees are just beginning to swell in preparation for spring. That can only mean one thing: time to make birch syrup.
We made birch syrup for the first time last year and tapped 10 birch trees in our yard. It was a grand experiment, and far more labor-intensive than I had imagined. Below is the process we used, as well as some notes and links to other birch syrup resources.
Birch sap is far thinner than maple sap. In fact, it takes about 100 gallons of sap to make a gallon of syrup. Birch sap begins to run in early April, so now is the time to consider harvesting.
Tools you’ll need:
- A drill and 7/16″ drill bit
- Plastic spiles (can find some here)
- Plastic 5 gallon buckets
- A shallow pan to evaporate sap (we used a roasting pan)
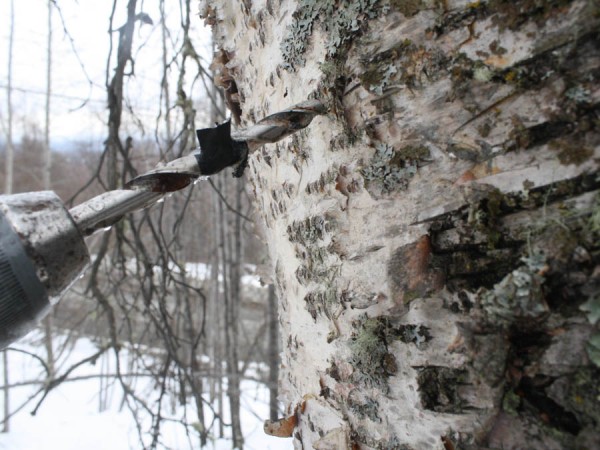
1. Drill holes
Sap runs up the tree around the perimeter — in fact, nearly all of the water is drawn up the tree just under the bark. If you’ve ever nicked a birch tree this time of year, you’ve seen how profusely they weep sap.
Drill holes 1 1/2 inches deep, on the north side of the tree, at a slight upward angle. Place a piece of tape on your drill bit (as shown below) to ensure proper depth.
Holes should be drilled on the north side of the trees. This prevents the buckets from heating up in the sun unnecessarily, which reduces the chances of the sap spoiling. Holes should be offset from previous years’ holes.
Find trees that have a large diameter, and are somewhere that you can easily access. Each tree can produce over a gallon a day, and with only 10 trees, we were still hauling heavy buckets of sap up and down our steep lot!
 2. Pound in a spile
Spiles should be gently tapped into the tree. You want the spile to be firm in place so no sap can escape around the edges, but not so tight that it impedes sap flow or cracks the sap wood.
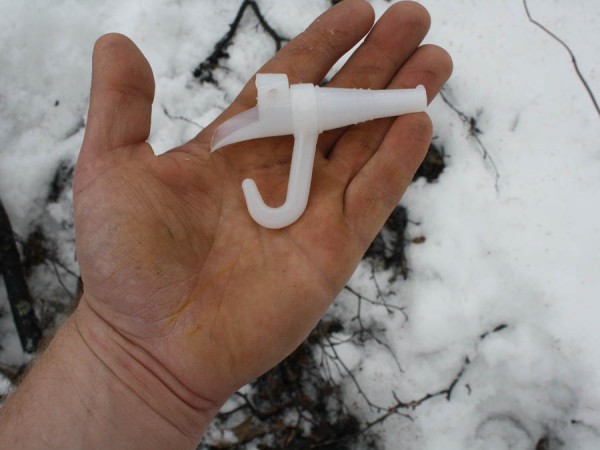
A spile.
3. Place a bucket under the spile.
Some people place mesh or other material on top of the bucket to reduce the amount of bark/bugs/etc that collect in the sap. I just ran all my sap through a tea filter or cheesecloth to remove any foreign material.
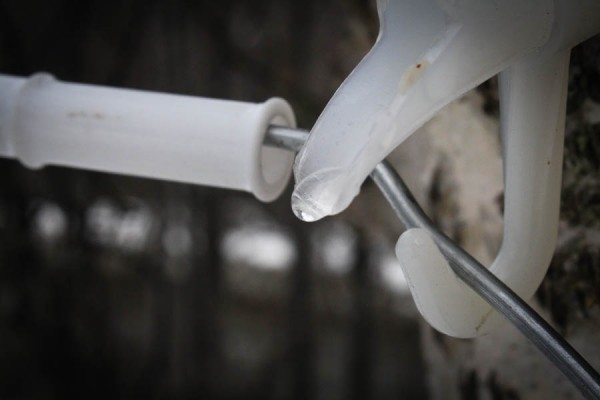
Birch sap dripping from the spile. At the peak of the sap flow, some trees produce more than a gallon of sap a day.
4. Collect sap once a day. Filter it and simmer it.
Sap must be collected daily. Because it’s water full of nutrients, it is easily contaminated by microorganisms if left out in the sun too long.
Evaporating the sap was by far the most time-consuming part of this process. We first tried evaporating it on a camp stove, but was going through fuel canisters way too fast. Eventually, we settled on using roasting pans on the stove. Our gas bill was substantially higher the month we made syrup, the windows had to be open to release all the moisture in the house, and the stove was running 8-12 hours a day. Commercial producers use reverse osmosis to remove most of the water, then evaporate the rest.
We ended up boiling the sap until it reduced by half, then simmered it on low until we removed the rest of the moisture. We had no way to determine how much water was left in the syrup, so we simply let it simmer on low until it appeared “syrupy.” Remember, five gallons of sap only creates about a 1/2 cup of syrup.
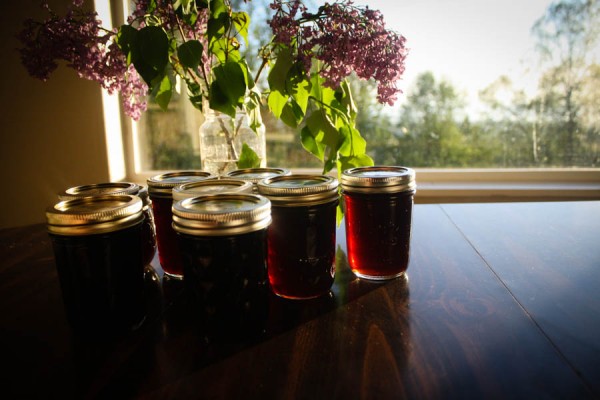
Finished birch syrup. With 10 trees, we ended up with about 6 quarts of syrup.
5. Put the syrup in jars and enjoy!
Syrup is fairly shelf-stable, so we simply boiled some canning jars, warmed the syrup, and placed the syrup in the jars. We didn’t process the jars at all. We found the syrup to have a stronger taste than maple. It was very reminiscent of molasses. We used it on pancakes (and I want to incorporate some into my homemade bacon brine). However, I have a friend who look a few pints and made a fantastic birch stout.
Additional articles:
Great guide from UAF cooperative extension service
Info from Kahiltna Birch Works
Info from birch Boy (SE Alaska)
Online source for spiles:
https://www.leaderevaporator.com/p-209-plastic-516-hooked-spout.aspx
Winemaking with ingredients from Costco
This winter I’ve been experimenting with small batches of wine from ingredients I’ve found at Costco. Some of the experiments are definitely…experiments…but we’ve had some pretty good success too. Below are my winemaking notes for one gallon batches of the wines I’ve tried:

From left to right: pineapple wine, mixed berry wine, peach wine. (The peach is still cloudy because it's still so young.)
Mixed Berry Wine:
- 3 lbs Costco frozen mixed berries
- 3 1/2 lbs sugar
- 1 lbs raisins
- Bordeaux or fruit wine yeast
- 1/2 tsp pectin enzyme
- 1 1/2 tsp yeast nutrient
- 1 gallon water
Notes:
This is a fantastic table wine. We haven’t been able to keep a gallon of this around for more than a couple months because it tastes so good. The raisins give the wine some much-needed body, but it still has a muted, somewhat-sweet berry flavor. This would be a great table wine to serve to guests. We’ll be making a 5 gallon batch soon for this purpose. And the best part (with all these wines) is that once you have the brewing supplies, the cost of the actual ingredients comes out to $3 a bottle or less. That’s hard to beat for handcrafted, sulfite-free wine!
Strawberry Wine:
- 3 lbs frozen strawberries, blended.
- 3 1/2 lbs sugar
- Bordeaux or fruit wine yeast
- 1/2 tsp of pectin enzyme
- 1 1/2 tsp of yeast nutrient
- 1 gallon water
Notes:
Decent wine, but it was a little astrigent when new. (It was all gone within two months, so it didn’t have a chance to age!) I’m planning on trying it again with honey. It should balance the flavors better, I think.
Pineapple Wine:
- 3 lbs of chopped or crushed pineapple and syrup
- 3 lbs of sugar
- Bordeaux or fruit wine yeast
- 1/2 tsp pectin enzyme
- 1 1/2 tsp yeast nutrient
- 1 gallon water
Notes:
This wine, when young, tasted akin to canadian-bacon and pineapple pizza — notes of both pineapple and yeast. However, it’s super strong (18% alc by volume). Because it didn’t taste good new, it’s had time to age. It’s become a little drier and less yeasty. I’ll bottle some up and see what it’s like in a year, but I don’t plan to make it again.
Peach Wine
- 3 lbs canned peachesand syrup
- 3 1/4 lbs sugar
- Bordeaux or fruit wine yeast
- 1/2 tsp pectin enzyme
- 1 1/2 tsp yeast nutrient
- 1 gallon water
Notes:
This wine is still really young, but it has good potential. The peach flavor is fairly muted, and the wine is crisp and somewhat dry. I’ll let this age a few more months, but I’m optimistic of the final product.
On the to-do list:
- Canned Pear Wine
- Maybe some fresh fruit wines as it comes into season??
- Blueberry Wine
Note:
If you don’t know how to make your own wine, go my tutorial here. Just adapt the process for these recipes.
Southcentral Alaska Gardening Guide
I just put up a brief guide to vegetable gardening in southcentral Alaska in the resources section of the website. You should go check it out. It’s very much a work in progress, so if you have any additional insights into vegetable gardening in the far north, please share!
-Erik
How to make raspberry-currant mead
 Hey everyone,
I just put up my recipe for making mead. We finished picking 20lbs of wild currants about a week ago, and I have my first of two six gallon batches fermenting right now. I opened a bottle of last year’s mead the other day, and it was incredible!
How to make home-made soap
 I just finished putting together a tutorial about making your own soap. You can check in out here.