Erik
How to Make Birch Syrup
With winter quickly melting away, the trees are just beginning to swell in preparation for spring. That can only mean one thing: time to make birch syrup.
We made birch syrup for the first time last year and tapped 10 birch trees in our yard. It was a grand experiment, and far more labor-intensive than I had imagined. Below is the process we used, as well as some notes and links to other birch syrup resources.
Birch sap is far thinner than maple sap. In fact, it takes about 100 gallons of sap to make a gallon of syrup. Birch sap begins to run in early April, so now is the time to consider harvesting.
Tools you’ll need:
- A drill and 7/16″ drill bit
- Plastic spiles (can find some here)
- Plastic 5 gallon buckets
- A shallow pan to evaporate sap (we used a roasting pan)
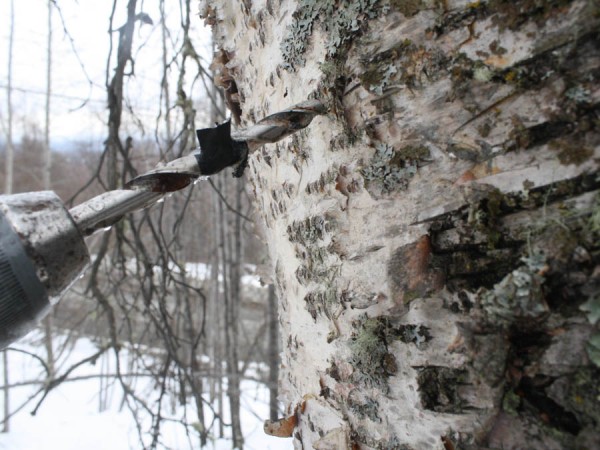
1. Drill holes
Sap runs up the tree around the perimeter — in fact, nearly all of the water is drawn up the tree just under the bark. If you’ve ever nicked a birch tree this time of year, you’ve seen how profusely they weep sap.
Drill holes 1 1/2 inches deep, on the north side of the tree, at a slight upward angle. Place a piece of tape on your drill bit (as shown below) to ensure proper depth.
Holes should be drilled on the north side of the trees. This prevents the buckets from heating up in the sun unnecessarily, which reduces the chances of the sap spoiling. Holes should be offset from previous years’ holes.
Find trees that have a large diameter, and are somewhere that you can easily access. Each tree can produce over a gallon a day, and with only 10 trees, we were still hauling heavy buckets of sap up and down our steep lot!
 2. Pound in a spile
Spiles should be gently tapped into the tree. You want the spile to be firm in place so no sap can escape around the edges, but not so tight that it impedes sap flow or cracks the sap wood.
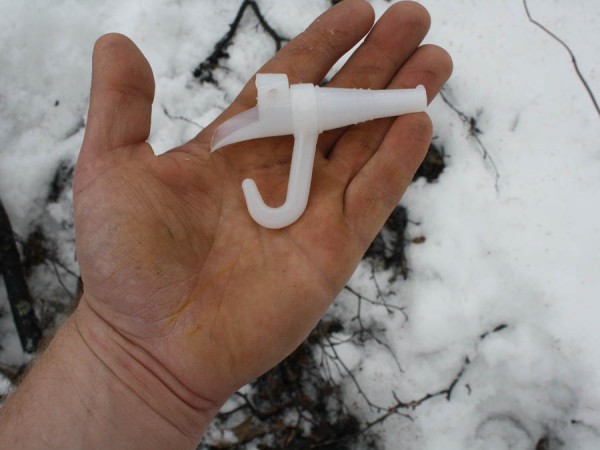
A spile.
3. Place a bucket under the spile.
Some people place mesh or other material on top of the bucket to reduce the amount of bark/bugs/etc that collect in the sap. I just ran all my sap through a tea filter or cheesecloth to remove any foreign material.
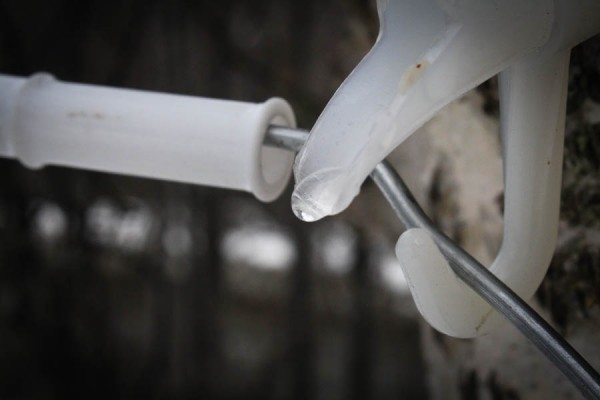
Birch sap dripping from the spile. At the peak of the sap flow, some trees produce more than a gallon of sap a day.
4. Collect sap once a day. Filter it and simmer it.
Sap must be collected daily. Because it’s water full of nutrients, it is easily contaminated by microorganisms if left out in the sun too long.
Evaporating the sap was by far the most time-consuming part of this process. We first tried evaporating it on a camp stove, but was going through fuel canisters way too fast. Eventually, we settled on using roasting pans on the stove. Our gas bill was substantially higher the month we made syrup, the windows had to be open to release all the moisture in the house, and the stove was running 8-12 hours a day. Commercial producers use reverse osmosis to remove most of the water, then evaporate the rest.
We ended up boiling the sap until it reduced by half, then simmered it on low until we removed the rest of the moisture. We had no way to determine how much water was left in the syrup, so we simply let it simmer on low until it appeared “syrupy.” Remember, five gallons of sap only creates about a 1/2 cup of syrup.
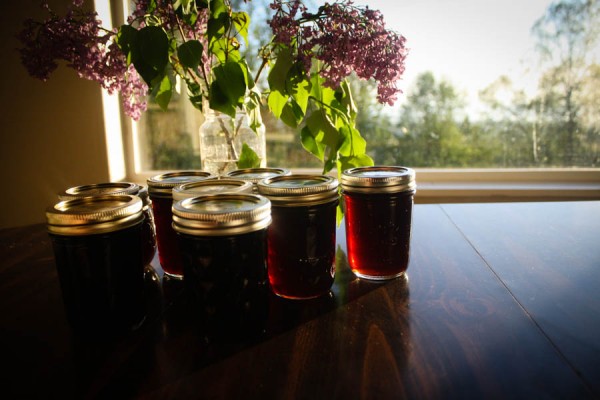
Finished birch syrup. With 10 trees, we ended up with about 6 quarts of syrup.
5. Put the syrup in jars and enjoy!
Syrup is fairly shelf-stable, so we simply boiled some canning jars, warmed the syrup, and placed the syrup in the jars. We didn’t process the jars at all. We found the syrup to have a stronger taste than maple. It was very reminiscent of molasses. We used it on pancakes (and I want to incorporate some into my homemade bacon brine). However, I have a friend who look a few pints and made a fantastic birch stout.
Additional articles:
Great guide from UAF cooperative extension service
Info from Kahiltna Birch Works
Info from birch Boy (SE Alaska)
Online source for spiles:
https://www.leaderevaporator.com/p-209-plastic-516-hooked-spout.aspx
No One Howls Anymore
I’ve been recently teaching my students Whitman, and introduced them to Ginsberg. While I haven’t written any poetry in a while, I really got inspired by rereading “Howl” and “America” by Ginsberg. At the same time, I have come to the conclusion that I fundamentally hate the 21st century (perhaps more on that later). Anyhow, here’s a quick poem written as a nod towards Ginsberg’s poetry and style.
I saw the best minds of my generation
destroyed by a billion tiny screens in silence.
Dreams, thoughts –personal fucking agency —
abandoned to the quiet cadence of mouse clicks,
rhythmic typing, fingers touching glass, searching for connection
on that cold and flawless surface.
I saw the young bodies of my comrades fold into themselves —
unnatural arches of the spine, heads down-turned in reverence to their
tiny gods.
I saw our hours consumed with raving mad images — bodies and breasts and mountains and makeup —
an unceasing scrolling tumbling river of images,
hope and sighs thrown out tinted windows at highway speeds
I don’t think they’ll be returning anytime soon.
No one howls anymore.
Our pockets contain: lint, screens, the entirety of human knowledge
and always loneliness, crouching.
Where are our words?
Why don’t we use “whom” anymore?
Why did I find the best of our language outside my neighbor’s trash can, sticky and damp from the rain?
I want to speak with you, brothers.
I want to touch you, sisters.
Let’s tell the world we knew to fuck itself
and then take a walk in the woods.
Let’s call ourselves pirates and go build a tree house.
The only thing the world can’t give us is innocence.
Maybe it’s lying in the neighbor’s trash too.
I better go find it under the rocks in the creek,
maybe in the way you take off your clothes.
Oh, and my friends don’t fuck anymore.
They recline pillowed heads,
intoxicate themselves with their blue pixies instead.
500 million bedrooms are strangely quiet — it’s becoming unsettling to me.
I give up on you, America,
you and your blue pixies.
I’m tired of your madness cloaked in silence,
your impotent, naked demands.
You’ve stolen my mind.
I’m starting to lose it
and all I can hear is your evil touchscreen symphonies.
I’ll find it though.
You won’t keep it from me forever.
And I’m starting to get the inkling
it’s around here someplace.
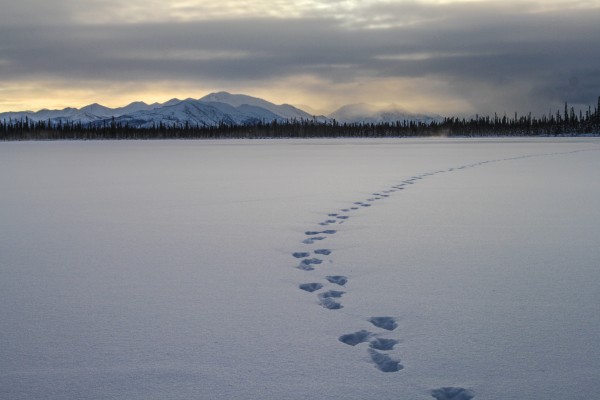
Reflections from the trapline
The woods after the first snowfall have a distinctive sound. The world becomes quieter, and any remaining sound is muffled, as though filtered through cotton. It’s in this new silence that I find myself snowshoeing through the trees. My headlight illuminates the forest ten feet in front of me — the entirety of my universe at this moment. Nightfall is arriving earlier every day here in Alaska, and these woods, now dark and covered with snow, seem strangely unfamiliar.
As I walk, I come upon tracks. With the recent winter storm, these tracks cannot be more than a day or two old. Here a squirrel raced from one spruce tree to the next. As a trapper, one begins to see the world through the eyes of the animals. I cannot help but think of the squirrel as he hopped through the snow. Was he full of fear as he moved through the open, looking skyward for an eagle or owl? Has he stored enough food for the winter? As I imagine him rushing over the snow, anxious and alone, I can almost sense that same feeling of trepidation running through my nerves.
 Here an arctic hare made his way along the edge of the willows. It’s been years since I’ve seen many hare tracks on this mountainside, and their huge, soft prints bring a smile to my face. They’ve returned.
Hare populations increase and decline in an almost clock-like fashion. Some years their trails crisscross the snow like highways designed by a madman. The animals are pure white and difficult to see, so their roads and back alleys are usually the only sign that they share the woods with me. When they are abundant one can sense their presence from their shadows moving across the snow. Eventually though, their population will collapse. A combination of overpopulation and predation takes their toll, and one winter their tracks will be gone. It will be a few years before I will see their tracks again, and ten before they once again lay down their snowy highways.
The trapper lives within this same cycle of plenty and hardship. The populations of fox, lynx, and coyote mirror the populations of hare, shrew, and squirrel. Trappers must accept, just like the animals they pursue, that their will be lean years and abundant years. Some winters the landscape seems eerily empty — as though it has been entirely abandoned. Other years, signs of winter life is etched into the snow with myriad footprints.
Trappers can help temper these cycles of overpopulation and collapse. Even to this day, trapping regulations usually stipulate no limit on the number of animals one can harvest in a season. It is up to the trapper to understand these cycles and not exploit the land. If an area is over-trapped, the breeding population of furbearers can no longer maintain itself and the animals will disappear. The landscape is out of balance, and will remain out of balance for some time.
Likewise, areas that remain untrapped suffer the worst of the boom and bust cycle. Without trappers to temper the number of predators, they can decimate the population of prey animals making the recovery of prey populations harder. Trapping, in some way, is stewardship of the land. It’s entering and participating in the natural cycles of the wilderness, while still being conscientious of it; making sure one never takes too much…
As I continue to walk, I come across fox tracks. A line of deep, straight dimples stretch across the snow in either direction from me. As I follow the tracks, I once again see the world from eyes other than my own. Where was he headed? Was he simply strolling through his territory, enjoying the silence as I do now? Perhaps he was hungry, cocking his head to one side to catch the impossibly faint sound of a shrew beneath the snow. I do not know, but I play all these scenarios through my mind, trying to enter his.
In a world where we think of all knowledge as coldly scientific, a trapper, hunter, or fisherman holds knowledge that is deeply personal. The favorite tree of the resident grouse. The small creek that never seems to freeze. The unpicked harvest of cranberries still on the bush. A trapper find a small piece of earth and lets it teach him. In this way, those lonely souls walking the woods at night carry a knowledge that is deeply personal and utterly unique. They “know” a landscape in a way no one else does.
Many people think of trapping as an activity that is somehow exploitative and wasteful. The idea of harvesting an animal for its fur, in the era of Gore-tex and nylon, seems unnecessary. They visualize scared-looking animals in traps, their dignity stripped from them. The reality of trapping is far more complex.
 When I come upon my catch, there is a mix of emotions. Certainly there is a feeling of pride. I’ve learned what the landscape has been able to teach me. All the scouting, preparation, and work have not been in vain. I’ve entered the animal’s world and have played a fair game.
Often that pride is accompanied by sadness. I’ve spent weeks, maybe months, playing the game and now the game is over. His tracks will disappear from the landscape, hopefully to be replaced next year.
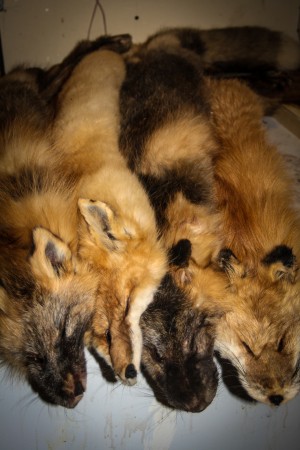
Above all, there is a feeling of respect for the animal. Touching its coat, feeling the softness and warmth, one cannot help but respect an animal that can thrive is such conditions. Every time I catch an animal, I carry it home in my arms. Part of this is pragmatic — I don’t want to damage the fur — but part of it is symbolic. The animal, whose life has been long extinguished, still deserves respect. Many emotions run through me in quick succession as I cradle it in my arms.
Trapping essentially centers around mortality, and I don’t think that fact is lost on many trappers. Trappers delight in a “clean catch,” where the animal was quickly killed and didn’t suffer much. Likewise, one is filled with remorse when one occasionally catches an animal improperly and it’s death was unnecessarily long.
I think about mortality a lot while I’m on the trapline. As I watch relatives die from cancer, as I notice parents getting older and slower, and as I carefully lift the stiff and cold weight of a fox out of the snow, I cannot help but think about death. How will I go? The trapline has illuminated my thoughts on my own ending. My hopes for the fox and myself are the same. In the end, I’m just hoping for a “clean catch.”
Skinning the animal is equally respectful. A well-skinned fur will fetch far higher prices than a sloppy one, but the ritual is more than that. It takes me about an hour and half to skin a fox. Every movement is a gentle one as I use my knife and my fingers to slowly undress it. Its scent fills my nostrils. I fuss and worry over it. For time to time, and step back purely to admire it.
Once the skin is off, stretched and dry, I take a hair brush and softly comb the hair backwards, revealing the thickness of the fur. It is a final ritual before I put the fur up, to be tanned or sold.
Most humans don’t receive such burial rites.
Once the fox is skinned, I take the carcass and strap it to my backpack or sled. I bring him back to woods, using him as bait for another set. Chances are, the ravens and eagles will get to him first. Most of him is returned to the land from which he came…
Tonight, however, my snares are empty. The fox has been hunting another part of his territory, and his tracks merely pass through this piece of woods. I leave the forest and pull my frosty hat off my head. Behind me, the quiet forest — my tracks mingling with his.
Thoughts on the gardening season (2013)
We just pulled the last of the potatoes and carrots out of the garden today, and I figure its time to reflect on this year’s growing season. 2013 was one of the nicest summers in recent memory. We received a ton of sunshine, and multiple days (and even weeks) in the 80’s. That’s unheard of for this part of Alaska. In addition, this was the first year we had a greenhouse, so I had the opportunity to grow veggies that I’ve never been able to grow before. Below are a series of notes about our season, and some reflections upon it.
The Greenhouse
All of our plants in the greenshouse did well, though our weeks of heat certainly stressed them, particularly the tomatoes. Even with a big wall fan running and all the vents and doors open, the greenhouse was still hovering around 100 F. I think that had a detrimental effect on the tomato growth, as the leaves curled and growth was slowed for nearly a month.
Speaking of tomatoes, we grew three different varieties: a wild cherry, a large slicing type, and Amish Paste. The slicing variety was by far the most productive. Overall, I had hoped for a larger harvest, but the aforementioned stress likely diminished our harvest. Next year I plan to try both determinite and indeterminite varieties and test which type is best for our short growing season.
Our first year of cucumbers was a huge success. We planted pickling cucumbers and an English-style greenhouse variety. They both did phenomenally, and both seemed to deal with the heat well. Our only complaint was that the picking cucumbers became bitter from heat stress during the hottest part of summer.
We planted three different varieties of peppers: jalepenos, a ristra type, and bell peppers. All the peppers did well, though the bell peppers weren’t nearly as prolific as I would have liked. I’m not sure if we planted them in too small pots, or if the variety we had was not ideal, but I’m thinking we won’t be planting many of them again.
Total Failures:
We tried pumpkins, sweet corn, cantaloupe, and watermelon in the greenhouse in containers this year. It was a total failure. Only the pumpkins put out decent blossoms, but even after having hand-pollinating them, the fruits rotted and fell off before maturing. We’ll use that space in the greenhouse for more tomatoes.
Speaking of failures, our onions were a complete failure this year. I bought onion starts and also grew a bunch from seed. I think the heat, combined with a very late spring, did them in.
While our fruit trees blossomed, none of them produced fruit this year. I’m not sure what that was about, but I suspect our strange spring (snow very late into the spring, then sudden, unseasonable warm temperatures) messed with the trees.
Berries:
Currants, raspberries, and rhubarb all did very well. We picked over 10 lbs of raspberries from our humble raspberry patch, and I was finally able to harvest our domesticated currants before the chickens got them. Wild berries were unbelievable this year as well. I’ve never seen larger blueberries in my life.
Honey:
With the warm summer came an excellent honey harvest. The bees had many, many days to fly and collect nectar. However, two factors worked against me this year. First, the spring was ridiculously cold. I literally had to dig through 2 ft of snow to find ground in order to set up my bee hives. I think the cold weather meant the colonies did not build up their populations as quickly as normal. Second, I had serious queen problems. In one hive, I tried to set up a 2-queen system, but for the second year in a row, it didn’t work out. In the other hive, I had a rogue queen hiding in there somewhere. She killed three other queens before I could confirm she was in there and producing eggs. What a pain. Nonetheless, we ended up with 45 lbs of honey from the two hives. Next year I’m shooting for 60-70 lbs.
Other Notes:
Cabbage, broccoli, potatoes, carrots, turnips, zucchini, salad mix, peas and lettuce all did well. They seem to be the consistently good veggies up here.
We did a bunch of canning this year! With the greenhouse produce, we had the opportunity to try canning a number of different things. We canned tomatoes, salsa, pickles, garlic scapes, and jalepenos. While the canning can be a lot of work, it’s satisfying to finally be able to preserve more of our harvest for the winter months.
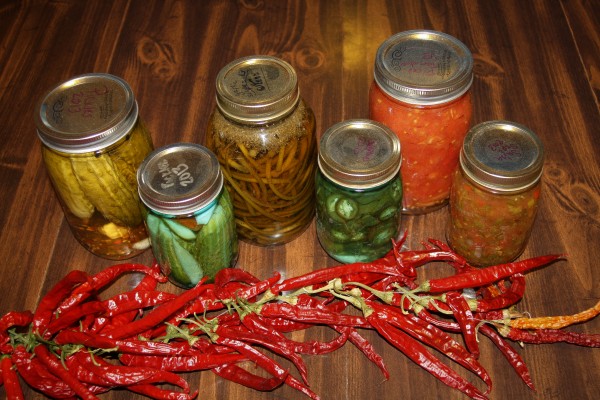
A selection of some of the canning we did this year…
The freezers are full of salmon, halibut, moose, and caribou, and the last of the yard chores are done. It’s finally time to wait for our first real snowfall, and look forward to the beginning of trapping season. Once trapping season is over in February, it will be time to start thinking about the growing season once again…
How to Make Salmon Roe Caviar
I’ve always wondered about making salmon caviar. I love tobiko and other fish eggs on my sushi, and every time I’ve thrown a skein of roe into the river as I cleaned my salmon, I wondered it I was, in fact, throwing away an edible part of the fish.
This year, I met a woman originally from Russia on the banks of the Copper River. She talked to us about making salmon roe caviar and my interest was piqued. Upon further research at home, I discovered that the UAF Cooperative Extension Service actually published a guide to making salmon caviar. I followed their recipe both times I made it, but there are much fancier recipes out there I’d like to try.
Below is the process of making the caviar.

Place a 3/8″ piece of wire mesh over a bowl.
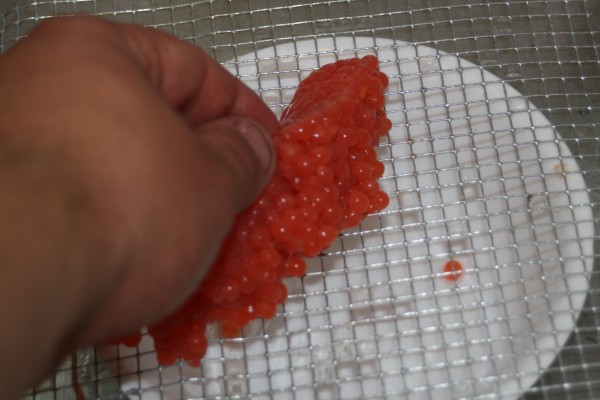
Rub the skein of eggs over the wire mesh. This will separate the individual eggs from the skein tissue.
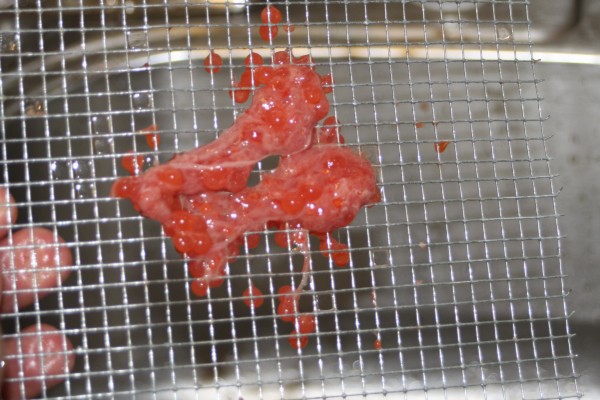
You’ll be left with a bowl full of eggs and the empty skein. Discard the skein tissue.
Eggs separated the skein.

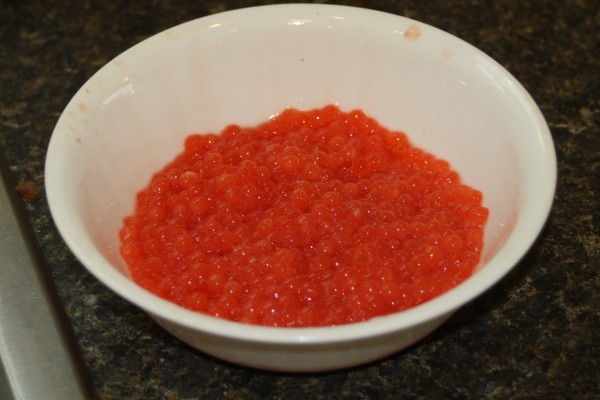
Add 1/2 cup of salt to 2 cups of water.
Add eggs to the brine for about ten minutes.
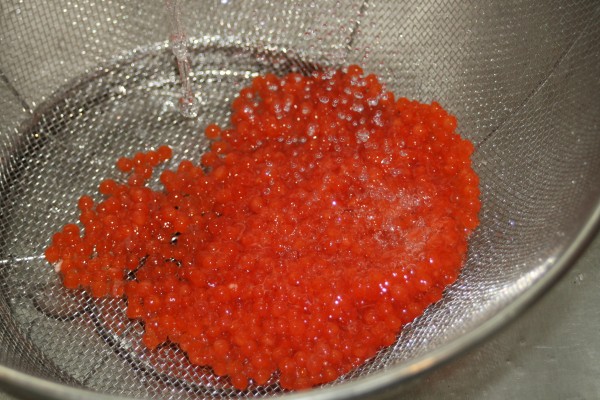
Take the eggs out of the brine and rinse with cold water.

Refrigerate. The eggs will keep for about two weeks. They taste fantastic with cream cheese, crackers, and chives. They’re also great on scrambled eggs!
In terms of taste, the eggs are almost entirely tasteless. I would argue they simply taste “salty, fresh, and rich.” More than anything, they add texture, color and richness to whatever you are serving, and they seem to be very versatile.
My 100th Post! (And a video)
This summer has been a busy one, and while I have many things to write about here, I simply have not been able to slow down long enough to actually write. (Look soon for posts on making birch syrup, making salmon caviar, milling lumber with a chainsaw and more!) In the meantime, I decided to make my first little “how-to” video. I went out with the boys and picked 10 lbs of red currants the other day to make my annual batch of currant-raspberry mead. I was dreading cleaning all those berries, then a simply idea dawned on me. (See video below.)
The Greenhouse
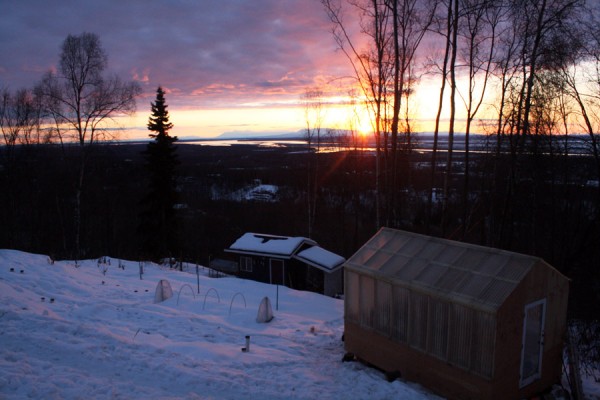
A fairly scenic place for a garden…
I’ve been wanting a greenhouse for a couple of years now, and this spring we finally made it happen. Warm weather crops like tomatoes, peppers, cucumbers, and the like are nearly impossible to grow here in Alaska without a greenhouse. While I’ve been able to successfully grow tomatoes, sweet corn, acorn squash and pumpkins here in Alaska without a greenhouse, it has required raised beds, hoop houses, and some serious luck.
With a greenhouse, we should be able to grow much healthier, productive plants. New veggies mean new challenges, which always makes for an interesting growing season.
The greenhouse is 16×10 feet, with seven foot walls. The peak of the roof is probably 10′ high. I built the floor for the greenhouse last fall just before the snow began to fall. The floor is built on 4×6 skids, supported with “linkin-log” style 2x6s underneath to keep it level. We have a pretty good slope to our yard, so while one side is ground level, the other side of the greenhouse is 4′ off the ground.
I threw a tarp over the floor this winter, then shoveled off the snow in March in order to build the walls and roof. My father-in-law had old fiberglass greenhouse panels that had been sitting in his yard for nearly 30 years. Although they were completely buried in leaf litter, they still had some life in them, and saved me over $1000 dollars in supplies. An acquaintance was getting rid of a very nice glass french door a couple years ago, which provided a beautiful (and free) entrance.
I ran out of old fiberglass panels before I got to the last side of the greenhouse, but because that side is north-east facing, with the mountainside behind it, I just covered that side with plywood that I’ll paint this summer. We shouldn’t lose much light, as the sun never shines from that side.
I haven’t built benches yet, but that project may wait until next year. For now, 5-gallon buckets on the floor should work just fine.

The plan this year is to grow 30-35 plants in the greenhouse. We’ll have a good variety of tomatoes, peppers, and cucumbers. The boys want me to grow sweet corn and pumpkins, so we may try those in containers as well. The greenhouse has already been up to 74F this week, with ambient temperatures only in the 40s, so it won’t be long!
All the best as you get ready for growing season!
An Unwelcome Guest
Today I came home from a hike and decided to give the chickens fresh water. As I was walking down to the chicken coop, I noticed three of the chickens outside in the sun. I was a little surprised, considering there is still a lot of snow on the ground, but I had shoveled a path for my little ladies a few weeks back, and I figured they were simply enjoying a warm and sunny spring day. I smiled as I passed them and said, “Enjoying the sun today, huh ladies?”
I opened up the chicken coop door wide.
What happened next, though it only took a total of two seconds, is as clear as day. I opened the chicken coop to see white feathers on the ground. That seemed unusual and just as I comprehended that something must have entered the coop and killed a chicken, I saw it: a red tailed hawk standing on the chicken roost three feet away. We saw each at about the same time and the hawk, frightened and clearly unable to find his way back out of the coop, flew into the window 2 feet from my head with a crash and dropped to the ground, then flew back up onto the perch.
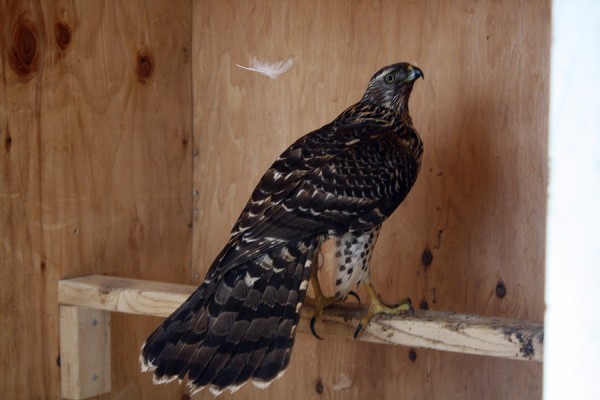
Screw you, hawk…screw you.
Before I even had time to shout my favorite four-letter word, I had the slammed the door. Staring at the closed door, I took a moment to confirm what I had just seen. There was a giant hawk stuck in my chicken coop.
Now the thinking began: how was I going to get this raptor out of the coop? He certainly couldn’t find his own way out but the idea of hitting a hawk with a broomstick until I shooed him out of the coop somehow sounded like a giant cluster-f**k. There was no telling when he’d eventually figure out how to get out, and in the meantime, the rest of the chickens were sitting in the snow, looking very paranoid about life.
Finally it dawned on me: if I opened the coop door wide, as well as the outside door to the coop/shed, there would be a seemingly large path for him to fly out. First, I took some pictures. I opened the door just enough to sneak my camera through, lest he think it a good idea to attack me. After showing the boys the hawk, I sent them and their mother up to the house while I opened both doors at the same time. Just as before, the hawk tried to fly through the window, and crumpled to the ground. This time, however, the hawk saw the opening and flew out as fast as his giant-killer-raptor-wings-of-death could carry him.
Thankfully, he only killed one chicken, and hopefully learned his lesson.
Rest in peace, Blizzard the Chicken. You laid tasty eggs.
Caribou Summer Sausage
My brother and I had a terrific hunt last fall where we were both lucky enough to harvest a caribou. Because we harvested big bulls, and it was after the rut, we decided to make most of the meat into sausage. We cut up the meat into chunks last fall and froze them in freezer bags. Because we knew the meat was likely going to be fairly strong-tasting after the rut, we tried a new strategy this year: we soaked the meat in milk.
It sounds weird, but a quick internet search reveals that milk been used by many hunters to take the “gamey” taste out of venison. We figured it might work for post-rut caribou too. Sure enough, it did. It took several days for the meat to thaw, and then it was soaked in milk for 24 hours. We drained the milk and rinsed off the meat. On accident, some of the meat had not been covered in milk, and the difference in aroma of the milk-soaked versus regular meat was pronounced. If we harvest post-rut bulls again, we’ll definitely be using this strategy once more.
We mixed our caribou 50/50 with pork shoulder while making the summer sausage. If I had to do it again, I would probably use a 2:1 caribou to pork ratio. It just seemed a little too “porky.”
I’ve already written a blog post on making your own summer sausage, but this time we decided to create our own recipes. The pre-mixed summer sausage seasoning from Alaska Butcher Supply contains MSG, and we weren’t really thrilled by that. Below you’ll see our recipes and our notes on the finished product.
Regular Recipe:
- 25 lbs ground caribou/pork
- 3 cups water
- 15 tbs salt
- 1/4 cup mustard seeds
- 1/4 cup ground pepper
- 3 tbs garlic powder
- 1 tbs marjoram
Notes: I would say this recipe tastes better than the store-bought mixes. It simply tastes like your typical “summer sausage flavor.”
Spicy Recipe:
- 25 lbs ground caribou/pork
- 15tbs kosher salt
- 2/3 cup red pepper flakes
- 2/3 cup mustard seed
- 4 tbs ground black pepper
- 4 tbs onion powder
- 2 tbs garlic powder
- 3 cups water
Notes: This was by far my favorite recipe. I like all things spicy, and while this recipe gave the sausage a little kick, I think I will add more pepper flakes (or jalepenos or cayenne powder) the next time to make it even spicier.
Sweet Recipe:
- 25 lbs ground caribou/pork
- 3 cups water
- 15 tbs kosher salt
- 1 1/2 cups brown sugar
- 4 tbs pepper
- 4 tbs mustard seed
- 2 tbs garlic
- 2 tbs onion
Notes: This one was, by far, the most unusual. It wasn’t bad by any means, but one could definitely taste the sweetness of the sugar. I think this recipe will work well for sausage sandwiches, and I’ll be curious to see how my kids like it.
Cottage bacon

Cured and smoked cottage bacon, before being fried.
A couple years ago I wrote a blog entry on how to make your own bacon. For a while now, I’ve had the itch to make more. The problem with making bacon is it can be prohibitively expensive. There is only one place in southcentral Alaska that sells raw pork belly, and they want $3.80 a pound for it. By the time you lose water weight from the cure, take off the pork skin, and buy the ingredients for the cure, you’re looking at bacon that costs close to $7/lbs. While I’ve gone that route before, it sounded too expensive to do again.
Then I found out about cottage bacon. Cottage bacon is simply bacon made from pork shoulder instead of pork belly. It’s leaner than regular bacon, and far cheaper to make. With that in mind, I set off to make my first batch of cottage bacon.
A Note on Nitrites/Nitrates:
I have some very strong ideas on the use of nitrates and nitrites in meat. I never use them in my bacon or sausage, and have done a fair bit of research on the dangers of nitrites and nitrosamines. I know the quality and care I put into making bacon and sausage, so I feel the nitrites are unnecessary.
However, nitrites are added to cured and processed meats to protect us from many harmful microorganisms, including botulism. Nitrites are sold as “pink salt” or sodium nitrite. If you choose to not use nitrites, you do it at your own risk. It’s a risk my family and I are willing to take, but you must make this decision on your own. Alaska Butcher Supply sells “pink salt.” If you use pink salt, add 12 grams of pink salt per 5lbs of meat, and make sure to reduce your regular salt by those 12g.
THE PROCESS:
1. Get pork shoulder. Costco sells pork shoulder (also called pork shoulder butt). My wife went in to Costco and asked for “pork butt.” After the employee realized she wasn’t kidding, she eventually found my wife the right cut. Boneless, it costs about $1.80 a pound here in AK. The package I purchased was about 15 lbs of pork and consisted of two shoulders. I cut each shoulder into half to end up to end up with four pieces of meat weighing in just under 4lbs a piece.
2. Make and add your cure. Since I had two shoulders, I decided to try two different cures. The important ratios to remember for any cure is the ratio of salt to meat and the ratio of salt to sugar. This will ensure your bacon does not come out too salty or too sweet. For instance, you should have about 12 grams of kosher salt for every pound of meat. Likewise, when adding a sweet taste, such as with maple and brown sugar, your bacon cure should have a sugar to salt ratio of about 2:1.
Below are my cure recipes for 5 lbs of pork. Do the math to adjust as necessary:
Maple and Brown Sugar Cure:
- 60 grams kosher salt
- 60 grams of brown sugar
- 60 grams of maple
Black pepper rub:
- 65 grams of kosher salt
- 25 grams sugar
- 1/3 cup of course ground black pepper (add pepper to rub). After the pork has cured for a week, and you’ve rinsed it, add a layer of pepper onto one side of the pork shoulder, to taste.
3. Let the pork cure for a week. Place the pork in ziploc bags and turn the pork over every day. The salt will draw out some of the liquid in the meat, and flipping it ensures the cure is able to evenly penetrate all parts of the meat.
4. Develop a pellicle. After a week, take to pork out of the bags. Rinse and pat dry. Then leave the pork, uncovered, in the fridge for 24 hours. This will create a sticky coating on the outside of the meat called a pellicle. The pellicle is what “takes up” the smoke flavor.
5. Smoke the bacon at 200F until the internal temperature reaches 150F. You can do this many ways. If you don’t have a smoker, you can add a pan of wet wood chips to a grill, allowing the bacon to take up some of the smoke flavor. Then you can finish it off in the oven at 200F. You can also do all of the smoking/cooking on the grill itself. You just don’t want the temperature to get more than about 200F, or the fat in the bacon will begin to melt. When I smoked the bacon in our home-made smoker, it took about 3 hours to reach 150F internal temperature.
6. Slice, package, freeze, or enjoy! Below you’ll see a picture of my cottage bacon. As you can see, it’s far leaner than regular bacon, and has a taste somewhere in between bacon, pork chops, and ham. It’s amazing…
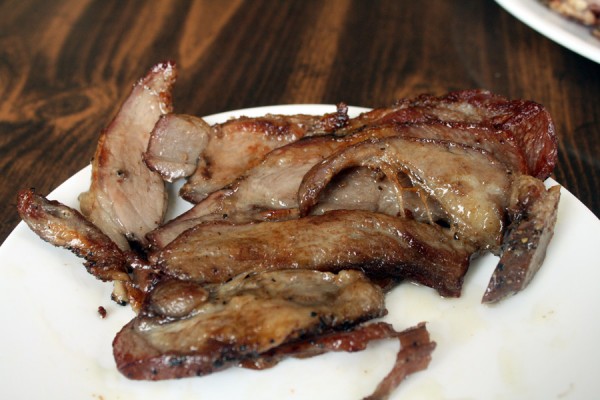
Cottage bacon, fried and ready to eat. And nitrite free! Yum.